
Block Blast Piece Shapes: Complete Visual Guide to Every Piece
Quick Answer: Block Blast piece shapes come in different varieties. These include 1×1 blocks, straight bars, squares, rectangles, L/J shapes, T shapes, and zigzag pieces. Difficult shapes need larger or more specific spaces. Since pieces cannot be freely rotated, recognizing them early helps you plan better.
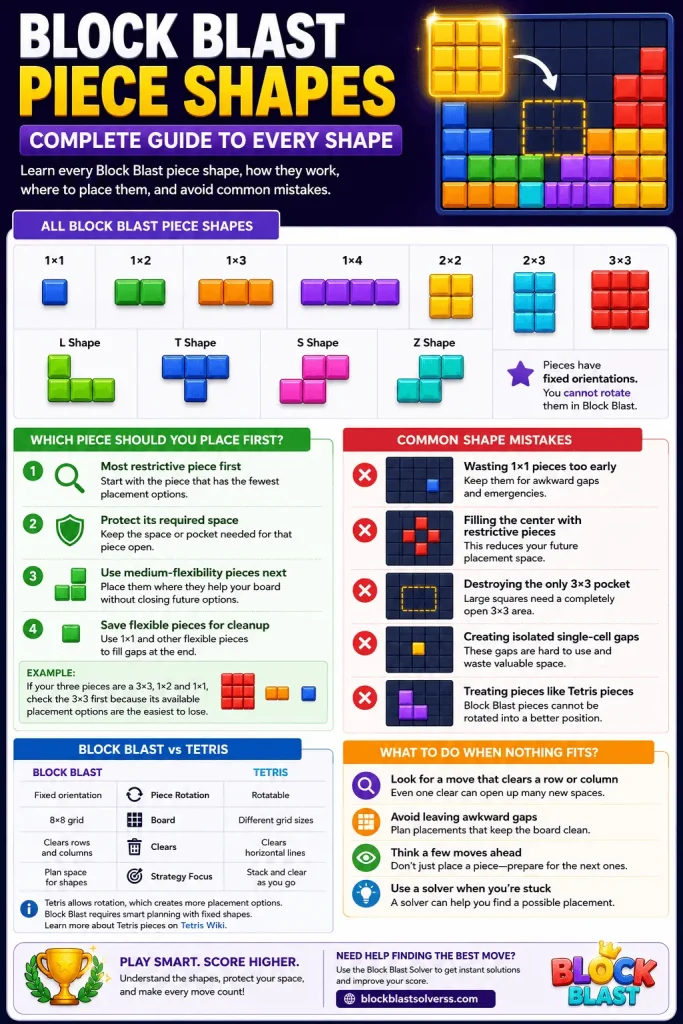
Have you ever get a 3×3 square, long bar, or awkward L shape with nowhere to put it? That moment can feel like bad luck. Often, it comes from placing earlier pieces carelessly. Block Blast has many shapes with different space requirements. The pieces also have fixed orientations. You cannot rotate them like Tetris pieces. Some fit almost anywhere. Others need very specific spaces.
The good news is that you don’t need complicated strategies. You just need to understand each Block Blast piece shape. Learn how much space it needs. Then learn where it fits best. This guide breaks down the main shapes visually. You’ll also learn which pieces are hardest to place. Keep reading to see every shape and learn how to place it without trapping your board.
Block Blast Piece Shapes at a Glance
Before getting into placement strategies, it helps to see the main Block Blast piece shapes in one place. Some pieces are simple and flexible, while others need a very specific amount of open space. Use this quick reference to identify a piece and understand its basic placement needs at a glance
| Piece | Shape | Cells | Difficulty | Best Use |
|---|---|---|---|---|
| 1×1 |
|
1 | Easy | Fill single gaps |
| 1×2 |
|
2 | Easy | Complete short lines |
| 1×3 |
|
3 | Easy | Short line clears |
| 1×4 |
|
4 | Medium | Open rows or columns |
| 1×5 |
|
5 | Hard | Long open lanes |
| 2×2 |
|
4 | Medium | Compact open spaces |
| L / J |
|
— | Medium/Hard | Corners and matching gaps |
| T |
|
— | Medium | Edges and open junctions |
| S / Z |
|
— | Medium/Hard | Matching staggered spaces |
| 2×3 / 3×2 |
|
6 | Hard | Large rectangular gaps |
| 3×3 |
|
9 | Very Hard | Reserved 3×3 spaces |
Which Shapes Need the Most Attention?
The 1×1, 1×2, and 1×3 pieces are generally the easiest to place. They give you plenty of flexibility and can often be used to finish an almost-complete line or fill a small gap.
Larger pieces need more planning. The 1×5 bar, 2×3 rectangle, and 3×3 square can become difficult when the board gets crowded. L/J, T, and S/Z pieces can also be restrictive because their fixed shape has to match the available space.
Tip: Don’t look at your pieces one at a time. Check all three pieces before making your first move. The most restrictive piece should usually influence how you manage the board.
Note: The exact Block Blast piece inventory and the way individual orientations are classified can vary between references. The competitor guides reviewed for this topic do not use an identical taxonomy, so shape counts and orientation labels should be verified against the current game before presenting a definitive total.
Block Blast Pieces by Size
Block Blast pieces range from tiny single blocks to large shapes that need carefully protected spaces. Grouping them by size makes it easier to see which pieces are flexible and which ones need more planning.
1-Cell Pieces
The 1×1 block is the most flexible piece in Block Blast. It fits into almost any empty cell. That makes it useful for cleaning up small gaps, but using it too early can waste its flexibility.
Best for isolated gaps and final line fills.
2–3 Cell Pieces
Small pieces are usually easy to place because they need very little open space. The 1×2 and 1×3 pieces are useful for completing short rows and columns.
Great for short line clears and narrow spaces.
Useful for finishing short rows or columns.
Match its fixed shape with a compatible opening.
4-Cell Pieces
Four-cell pieces need more planning as the board fills. Squares are compact, while bars and irregular pieces need the right opening.
Look for a clean 2×2 pocket before placing it.
Keep a straight row or column open for it.
Needs an opening that matches its stem and top.
5+ Cell Pieces
Larger pieces deserve more attention because they need organized open space. The 1×5, 2×3, and 3×3 can become difficult when the board gets crowded.
Use it while a long open lane is still available.
Preserve organized rectangular spaces for this piece.
Protect a clean 3×3 pocket whenever possible.
Got a Weird Block You Can’t Identify?
Some Block Blast pieces look confusing at first. Learn what weird blocks are and how to get them in your game.
Hardest Block Blast Shapes to Place
Not every Block Blast piece is difficult for the same reason. The hardest shapes are the ones with fewer realistic placement options. Here are the pieces that deserve the most attention, ranked by how much space and flexibility they require.
3×3 Square
The 3×3 square needs a completely open three-by-three area. That becomes much harder to find once the board starts filling. If you see one in your queue, check for a usable pocket before making other placements.
1×5 Long Bar
The 1×5 bar needs five consecutive empty cells in a straight line. Small gaps can quickly destroy its available placements. Keeping one open row or column can make this piece much easier to handle.
Large Rectangle
A 2×3 or 3×2 rectangle needs a larger organized area than most smaller pieces. Randomly filling the board can break these spaces into smaller gaps that the rectangle can no longer use.
L/J, T, S/Z Shapes
Irregular pieces can be restrictive because their fixed shape has to match the available opening. A space that looks large enough may still fail if its cells do not match the piece’s exact pattern.
A piece becomes difficult when it has fewer realistic positions on the board. The key factors are space required, placement flexibility, and the main risk created when you wait too long. Looking at these three factors is more useful than simply calling a piece “easy” or “hard.”
Where Should You Place Each Block Blast Shape?
Knowing the shape is only half the battle. The better question is where that piece should go without damaging your next move. Flexible pieces can clean up small gaps, while larger or irregular shapes need more deliberate spaces. Use the table below as a quick placement guide, then check the visual examples for the trickier pieces.
| Shape | Best Location | Avoid |
|---|---|---|
|
|
Single-cell gaps | Wasting open space |
|
|
Near-complete lines | Creating awkward gaps |
|
|
Open row or column | Crowded board |
|
|
Compact or corner areas | Fragmenting the center |
|
|
Matching corners | Isolated gaps |
|
|
Compatible edge/junction | Blocking useful space |
|
|
Matching staggered space | Unsuitable walls |
|
|
Reserved open pocket | Fragmented board |
Good vs. Bad Block Blast Placement
The difference is not always about finding an empty space. A good placement also keeps useful spaces open for your next pieces. These examples show how placing restrictive shapes carelessly can limit your options.
Can You Rotate Block Blast Pieces?
No, you cannot rotate Block Blast pieces. Each piece appears in a fixed orientation, so you have to work with the shape exactly as it is given. This makes planning your next move more important, especially when the board starts getting crowded.
This is one of the biggest differences between Block Blast and Tetris. In Tetris, you can rotate pieces to find a better fit. In Block Blast, an L, T, or S/Z shape must fit the available space in its current position. That makes irregular pieces harder to place and means you should look for a matching opening before filling the surrounding cells.
Block Blast
Fixed piece orientationTetris
Rotatable piecesNeed help with your current pieces? Use the Block Blast Solver to find a possible placement instead of guessing your next move.
Use Block Blast Solver →Piece Placement & Mistakes
The safest move is not always the piece that clears a line immediately. Look ahead and protect the placement options you are most likely to lose.
Which Piece Goes First?
If your three pieces are a 3×3, 1×2, and 1×1, check the 3×3 first. Its available placement options are easier to lose.
Common Shape Mistakes
Want better Block Blast strategies? Learn practical tips for creating more space, clearing more lines, and pushing your score higher.
Read Tips & Tricks →Frequently Asked Questions
Final Thoughts
Block Blast becomes much easier when you understand how each piece fits into your overall board. Keep restrictive shapes in mind, protect useful spaces, and avoid wasting flexible pieces too early.
Bookmark Block Blast Solvers and come back whenever you need help finding the right move.